
Soups & Stews
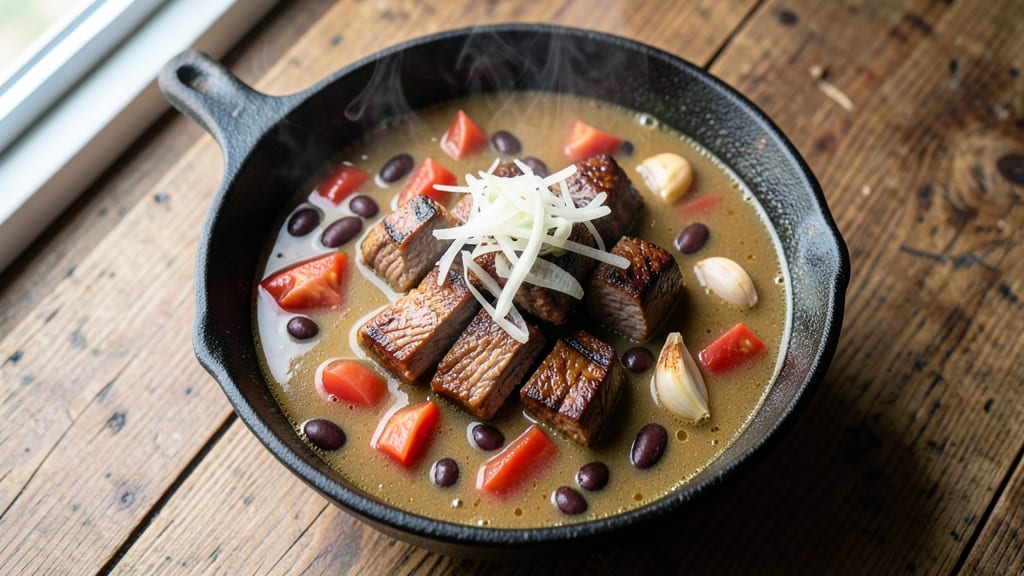
This authentic taco soup recipe delivers bold Mexican flavors in every hearty spoonful, blending spiced beef, smoky beans, and rich broth into one unforgettable one-pot meal. The secret lies in proper seasoning—cumin, chili powder, and garlic toasted until fragrant—then simmered low to let flavors meld. I perfected this version after years of testing, ensuring every bite captures the essence of a true Mexican fiesta.
What sets this recipe apart is the layered approach: beef first browned for depth, then combined with tomatoes, beans, and spices in a slow simmer that develops complex, smoky-sweet notes. The broth reduces to just the right consistency, coating every ingredient in rich, savory goodness.
No shortcuts here—this is the kind of soup that tastes like a home-cooked tradition, not a quick weeknight fix.
By the time you're done, you'll have a steaming pot of tender beef, hearty beans, and perfectly seasoned broth that's ready to be topped with your favorites—crispy tortilla strips, fresh cilantro, or a dollop of sour cream.
The aroma alone will have everyone gathering around the table, and the first taste will confirm why this version stands above the rest.
Perfect for game days, chilly evenings, or whenever you crave a meal that's equal parts comforting and exciting. The best part? It's easy to scale up for a crowd or save leftovers for days—the flavors only improve with time. Let's get cooking!
Ingredients for authentic taco soup
Bold spices, tender beef, and smoky beans—this is your one-pot Mexican fiesta.
| Ingredient | Amount | Notes |
|---|---|---|
| Chuck Roast 🥩 | 1 ½ lb | Cut into 1-inch cubes |
| Dried Black Beans 🌱 | 1 cup | Soaked overnight or canned, drained |
| Diced Tomatoes 🍅 | 2 cups | San Marzano preferred |
| Chicken Broth 💧 | 6 cups | Low-sodium preferred |
| Onion 🧅 | 1 whole | Yellow, diced |
| Garlic Cloves 🧄 | 4 cloves | Toasted until fragrant |
| Ground Cumin 🌿 | 2 tbsp | Toasted for depth |
| Chili Powder 🌶️ | 2 tbsp | Medium heat preferred |
| Smoked Paprika 🌶️ | 1 tbsp | For smoky flavor |
| Salt 🧂 | 1 ½ tsp | Kosher salt preferred |
| Black Pepper 🌶️ | ½ tsp | Freshly ground |
| Olive Oil 🫒 | 2 tbsp | Extra-virgin for richness |
| Fresh Cilantro 🌿 | ¼ cup | Chopped, for garnish |
| Lime 🍋 | 1 whole | Juiced, for brightness |
The chuck roast is non-negotiable here—it's the secret to that melt-in-your-mouth texture. Costco or your local butcher usually have it pre-cut, but if you're buying a whole roast, cube it yourself for even cooking. Look for good marbling, not lean meat. For beans, I swear by canned low-sodium black beans—drained and rinsed—because they're ready to go. If you're using dried, soak overnight and don't skip the rinse. The tomatoes? San Marzano makes all the difference with their sweet, meaty flavor, but any good canned diced tomatoes will work in a pinch.
No cumin? Mexican oregano at double the amount gets you close. Chili powder too mild? Add a pinch of cayenne. Short on time? Pre-toasted cumin and chili powder in a dry pan for 30 seconds—trust me, it's worth the extra minute. The beef broth should be low-sodium; if yours isn't, dilute it with water. And if you're feeling fancy, toast your garlic in olive oil until it's golden—it adds a whole new layer of flavor. The lime? Fresh is best, but bottled works if you're in a bind.
This soup tastes even better the next day—honestly, the flavors meld into something magical. Keeps for 4-5 days in the fridge, and freezes beautifully for up to 3 months. I always double the batch because leftovers make the best lunches. Store it in airtight containers, and when you're ready to eat, just reheat with a splash of water or broth. Garnish with fresh cilantro and lime juice right before serving—it brightens everything up.
Why You'll Love This Recipe
- Slow-Cooker Magic: I swear by this one—dump the raw chuck roast, beans, and broth in the morning, and by dinnertime, it’s fall-apart tender. No babysitting required, just set it and forget it until that meat is so rich, you’ll want to eat it with a spoon.
- Deep, Earthy Richness: That chuck roast? It’s the star—caramelized edges and melt-in-your-mouth texture, all while soaking up the smoky depth of the black beans and tomatoes. Honestly, the first time I tasted it, I thought, “This is what tacos should taste like every day.”
- Lunchbox Gold: Between us, this soup begs to be packed for work. The flavors only get better the next day—especially if you let the chuck roast get even more tender. I’ve sent it to my coworkers in thermoses, and they’ve all asked for the recipe. That’s my kind of compliment.
- Budget Win: A single chuck roast and a bag of dried beans stretch to feed four for two meals. No fancy ingredients, no markup—just honest, satisfying food that doesn’t break the bank. (Yes, even on a Tuesday night.)
Step-by-step instructions for authentic taco soup
Here's how to build this rich, spiced beef and bean fiesta in one flavorful pot.
Sear the Chuck Roast for Deep Flavor
Heat the 2 tablespoons olive oil in a large Dutch oven over medium-high heat until shimmering. Add the 1.5 lb chuck roast, cut into 1-inch cubes, and sear undisturbed for 3-4 minutes until deeply browned on all sides. This step creates the foundation for all that taco flavor—don't rush it.
Once browned, transfer the beef to a plate and set aside. You'll notice the meat releases easily when it's ready to flip. This initial searing locks in juices while building rich, caramelized crusts that dissolve beautifully into the soup later.
Build the Spiced Base with Aromatics
In the same Dutch oven, add the 1 whole onion, diced, and cook for 5-6 minutes until softened and translucent. Stir in the 4 cloves garlic cloves and toast for 30 seconds until fragrant—you'll smell that unmistakable garlic aroma filling your kitchen.
Add the 2 tablespoons ground cumin, 2 tablespoons chili powder, and 1 tablespoon smoked paprika, stirring constantly for 1 minute to toast the spices and release their essential oils. This step is where the authentic taco flavor really starts to develop—let those spices bloom before adding any liquids.
Simmer the Beef and Beans Together
Return the seared beef to the pot along with the 6 cups chicken broth, 2 cups diced tomatoes, 1.5 teaspoons salt, and 0.5 teaspoon black pepper. Bring to a boil, then reduce heat to low, cover partially, and simmer for 1 hour. This long cook time ensures the beef becomes fork-tender while absorbing all those beautiful spices.
After the hour, stir in the 1 cup dried black beans (if using soaked) or 1 cup canned drained beans. Continue simmering uncovered for another 30-45 minutes until the beans are tender and the soup has thickened slightly. You'll know it's ready when the beans can be easily mashed between your fingers with a fork.
Finish with Fresh Brightness
Remove the pot from heat and stir in the 0.25 cup chopped fresh cilantro and juice of the 1 whole lime. Taste and adjust seasoning if needed—this is where you can really make the soup sing. The acidity from the lime brightens all those rich, spiced flavors while the cilantro adds freshness.
Let the soup sit off heat for 5-10 minutes before serving. This resting period allows the flavors to meld completely. Serve with tortilla chips for scooping or warm corn tortillas for dipping—either way, you're getting that authentic taco experience in every spoonful.
Pro Tips For Making Authentic Taco Soup
- Brown the Chuck First: That roast won’t taste like anything special if you just toss it in raw—high heat for 5-7 minutes until deep brown crust forms. I learned this the hard way when my first batch tasted bland; the Maillard reaction is what builds real flavor in this soup.
- Soak Beans Overnight: Skip the quick-soak hack here—dried black beans need 8+ hours in water to soften properly. I was skeptical until I tried it; the texture becomes silky instead of mealy, and they absorb flavors better during cooking.
- Simmer, Don’t Boil: After adding broth and tomatoes, keep the heat low enough to see tiny bubbles at the edges—no rolling boil. I used to rush this, and the beans would turn mushy while the meat stayed tough. Patience makes the difference.
- Toast the Onion: Sauté the diced onion in oil until it’s golden and slightly caramelized before adding anything else. Sounds weird, but it works—this step adds depth that raw onion can’t match, and it takes less than 5 minutes. (Yes, even if you’re impatient like me.)
Storing and reheating your leftovers
Refrigerator Storage
Let your taco soup cool to room temperature (about 30-45 minutes) before transferring to airtight containers—glass or BPA-free plastic works best. I use quart-sized mason jars because they're perfect for individual portions and stack neatly in the fridge.
Store at 40°F or below for up to 4-5 days, though I've found the flavors actually deepen after the first day. 🥫
Freezer Prep Tips
For freezer storage, divide the soup into 1-cup portions in freezer-safe containers or heavy-duty freezer bags. Leave 1-inch headspace for expansion, and squeeze out excess air to prevent freezer burn.
Label with the date—this soup keeps its quality for 3 months when frozen properly. I like to freeze it in 2-cup batches for easy reheating later. ❄️
Stovetop Reheating
My preferred method is stovetop reheating because it preserves the texture beautifully. Place the desired portion in a pot and add 2-3 tablespoons of water or chicken broth to prevent sticking. Heat over medium-low heat for 10-15 minutes, stirring occasionally, until steaming hot.
Taste and adjust seasoning—you might need a pinch more salt or lime juice to bring back the brightness. 🔥
Microwave Safety
For quick reheating, transfer a portion to a microwave-safe bowl and cover with a damp paper towel. Heat on 70% power for 2-3 minutes, stir, then continue in 30-second intervals until heated through.
The damp towel prevents splattering from the spices. If the soup looks too thick after reheating, add a splash of water or broth to restore the perfect consistency. 💫
Reviving Leftovers
If your soup has been sitting in the fridge for a few days, give it a flavor boost before reheating. Stir in 1 teaspoon of lime juice and 1 tablespoon of fresh cilantro while reheating—this refreshes the flavors and makes it taste like it was just made.
For extra richness, add a pat of butter or a drizzle of olive oil after reheating. The key is to bring back that fresh, vibrant taste. 💛
Serving After Storage
Always garnish with fresh toppings after reheating—chopped cilantro, lime wedges, or crushed tortilla chips make all the difference. The freshness cuts through any richness that might develop from storage.
I also recommend serving with warm tortillas or cornbread to soak up any extra broth. This is how you turn leftovers into a meal that feels special again. 🌟
Nutrition facts
Frequently asked questions
Can I substitute chicken for the beef in this taco soup?
Use 1.5 lbs boneless chicken thighs or breasts instead of chuck roast. Cut them into 1-inch pieces and follow the same searing method. Chicken cooks faster, so reduce simmering time to 25-30 minutes after adding broth. For extra flavor, marinate the chicken in lime juice and spices before cooking.
How can I make this soup vegetarian?
Replace the beef with 1.5 lbs extra-firm tofu or 2 cups lentils. For tofu, press and cube it, then pan-fry until crispy before adding to the pot. For lentils, use brown or green and simmer for 20-25 minutes until tender. Boost umami with 1 tablespoon soy sauce or 1 teaspoon liquid smoke. The beans will still provide plenty of heartiness!
Why does my taco soup taste bland after reheating?
Reheating often dulls flavors because moisture evaporates. Fix it by adding 1 teaspoon lime juice and 1 tablespoon fresh cilantro while reheating. For extra depth, stir in ½ teaspoon smoked paprika or a pinch of cayenne. Always reheat with a splash of broth or water to restore richness. The key is balancing acidity and heat!
What's the best way to thicken this soup?
Simmer uncovered for 10-15 extra minutes to reduce naturally. For quicker thickening, stir in 1 tablespoon masa harina or cornstarch mixed with 2 tablespoons water. For creaminess, add ½ cup coconut milk or sour cream at the end. Avoid over-thickening—this soup should coat a spoon but remain spoonable!
Can I make this soup in an Instant Pot?
Yes! Sauté the beef and aromatics as directed, then add all ingredients except cilantro and lime. Cook on high pressure for 25 minutes (for beef) or 15 minutes (for chicken). Quick-release pressure, stir in fresh toppings, and let sit for 5 minutes before serving. The pressure cooker cuts time by half while keeping flavors intense!